
.jpg)
This is the story of the design/build process of our off-grid tiny home, which we built during the winter months of 2016-2017.
I should clarify up-front that ours is not like most of the glitzy tiny homes you might find on the internet, brimming with microwaves, flat-screen TV's, washing machines, and propane cookers. Our tiny home was carefully designed to have the smallest environmental footprint possible, while still providing its inhabitants with a quality of life that meets the high standards of the developed world. We strongly prioritized the use of natural materials, and offset the added weight with an open floor plan and a lightweight attached greenhouse off of the back. And perhaps most uniquely of all, we strove to create a tiny home to serve as an off-grid, self-sufficient, well insulated living space, capable of enduring the hard winters here in the foothills of the Adirondacks. So unlike many tiny homes out there, this tiny home requires no hookups to operate; generates its own photovoltaic electricity; collects and filters potable rainwater; features a versatile multi-fuel stove for heating and cooking; and was built without the use of vinyl, MDF panels, fiberglass insulation, or other off-gassing materials.
This article will first walk through the build process of the tiny home, and then dive into the details of the different off-grid elements this tiny home incorporates.

Part 1: Trailer Selection and Size Limits
The first step of building a mobile tiny home - and arguably the most consequential step - is selecting the trailer. We decided to buy our trailer new through PJ Trailers, for a number of reasons. First of all, they are a reputable trailer manufacturer that is familiar with the concept of tiny homes (they even have a dedicated page on their website about them); secondly, buying a new trailer gives your precious tiny home the maximum lifespan possible; and thirdly, buying new allows you to customize the trailer to exactly fit your needs. In our case, we were looking for a trailer that would provide us with some specific features to enhance and protect the tiny home (low deck height, drive-over fenders, rub rails, stabilizer jacks, no pre-installed decking), while also allowing us to build right up to the permissible limits in terms of width, length, height, and weight - without the need for a commercial driver's license. While every state has its own unique rules about this, we decided to err on the cautious side and set our limits at 8-1/2 ft wide, 20 ft long, 13-1/2 ft tall, and 9,900 lbs fully loaded.
The dimension with arguably the most ambiguity is the maximum permissible length - the general rule of thumb is that without a CDL, both the vehicle and the trailer in tow should stay below 40 ft in length. The ambiguity arises from the fact that pickup trucks come in a wide variety of lengths. To account for this, some people choose to design their tiny home to be compatible with their specific model of truck. However, in our case, we do not own a pickup truck; we do not plan on taking frequent road trips with our tiny home (a nerve-wracking undertaking, from what I understand); and, after running the numbers, we concluded that we would save thousands of dollars every year (not to mention environmental footprint) by simply renting a heavy duty pickup on the rare occasions when the tiny home needs to be moved. Another common trick to maximize tiny home length is to use a gooseneck trailer and build a loft over the gooseneck. However, taking into consideration that our tiny home build would be strongly prioritizing natural materials (which are often heavier than less-natural alternatives), we calculated that 20 ft would actually be a reasonable maximum length that we could achieve, without exceeding our GVWR limit.
So, after selecting our trailer and finalizing our design, the final dimensions of our tiny home are:
- 8-1/2 ft wide: This is the total width of the trailer, including the rub rails. The structure itself is 8 ft wide, which allows the rub rails to protect the siding from any potential "fender benders." This also allowed us to install custom-made 3" gutters at the roofline while staying within the overall width limits;
- 20 ft long: Excluding the tongue, this is the length of the flatbed and tiny home. To keep our dimensions standardized for a simpler, stronger build, the "main" structure is 16 ft long, and the attached greenhouse at the rear of the trailer is 4 ft long;
- 13 ft tall: We decided to err on the side of caution and design the roof peak and the final chimney height to stay a tad below the legal limit;
- 8,800 lbs empty, keeping us safely below the maximum 9,900 lbs gross weight when fully loaded.


Part 2: Subfloor, Framing, and Sheathing
To save on height, the trailer was delivered without any pre-installed decking. This allowed us to install 3.5" of R-21 polyiso foam subfloor insulation between the trailer's existing C-channel joists, saving a few inches of precious headspace for the interior living area later on. First, 2x2 battens were screwed to the tops of the C-channel joists, providing a smooth, flat, wooden surface for attaching the future subfloor. Then the polyiso foam was fitted between the joists, and sprayfoam insulation and reflective foil tape were used to ensure a tight seal. Metal roofing panels were then screwed to the underside of the trailer's joists, protecting the subfloor insulation from the elements, and the "subfloor sandwich" was completed with the addition of a 1/2" CDX plywood subfloor.


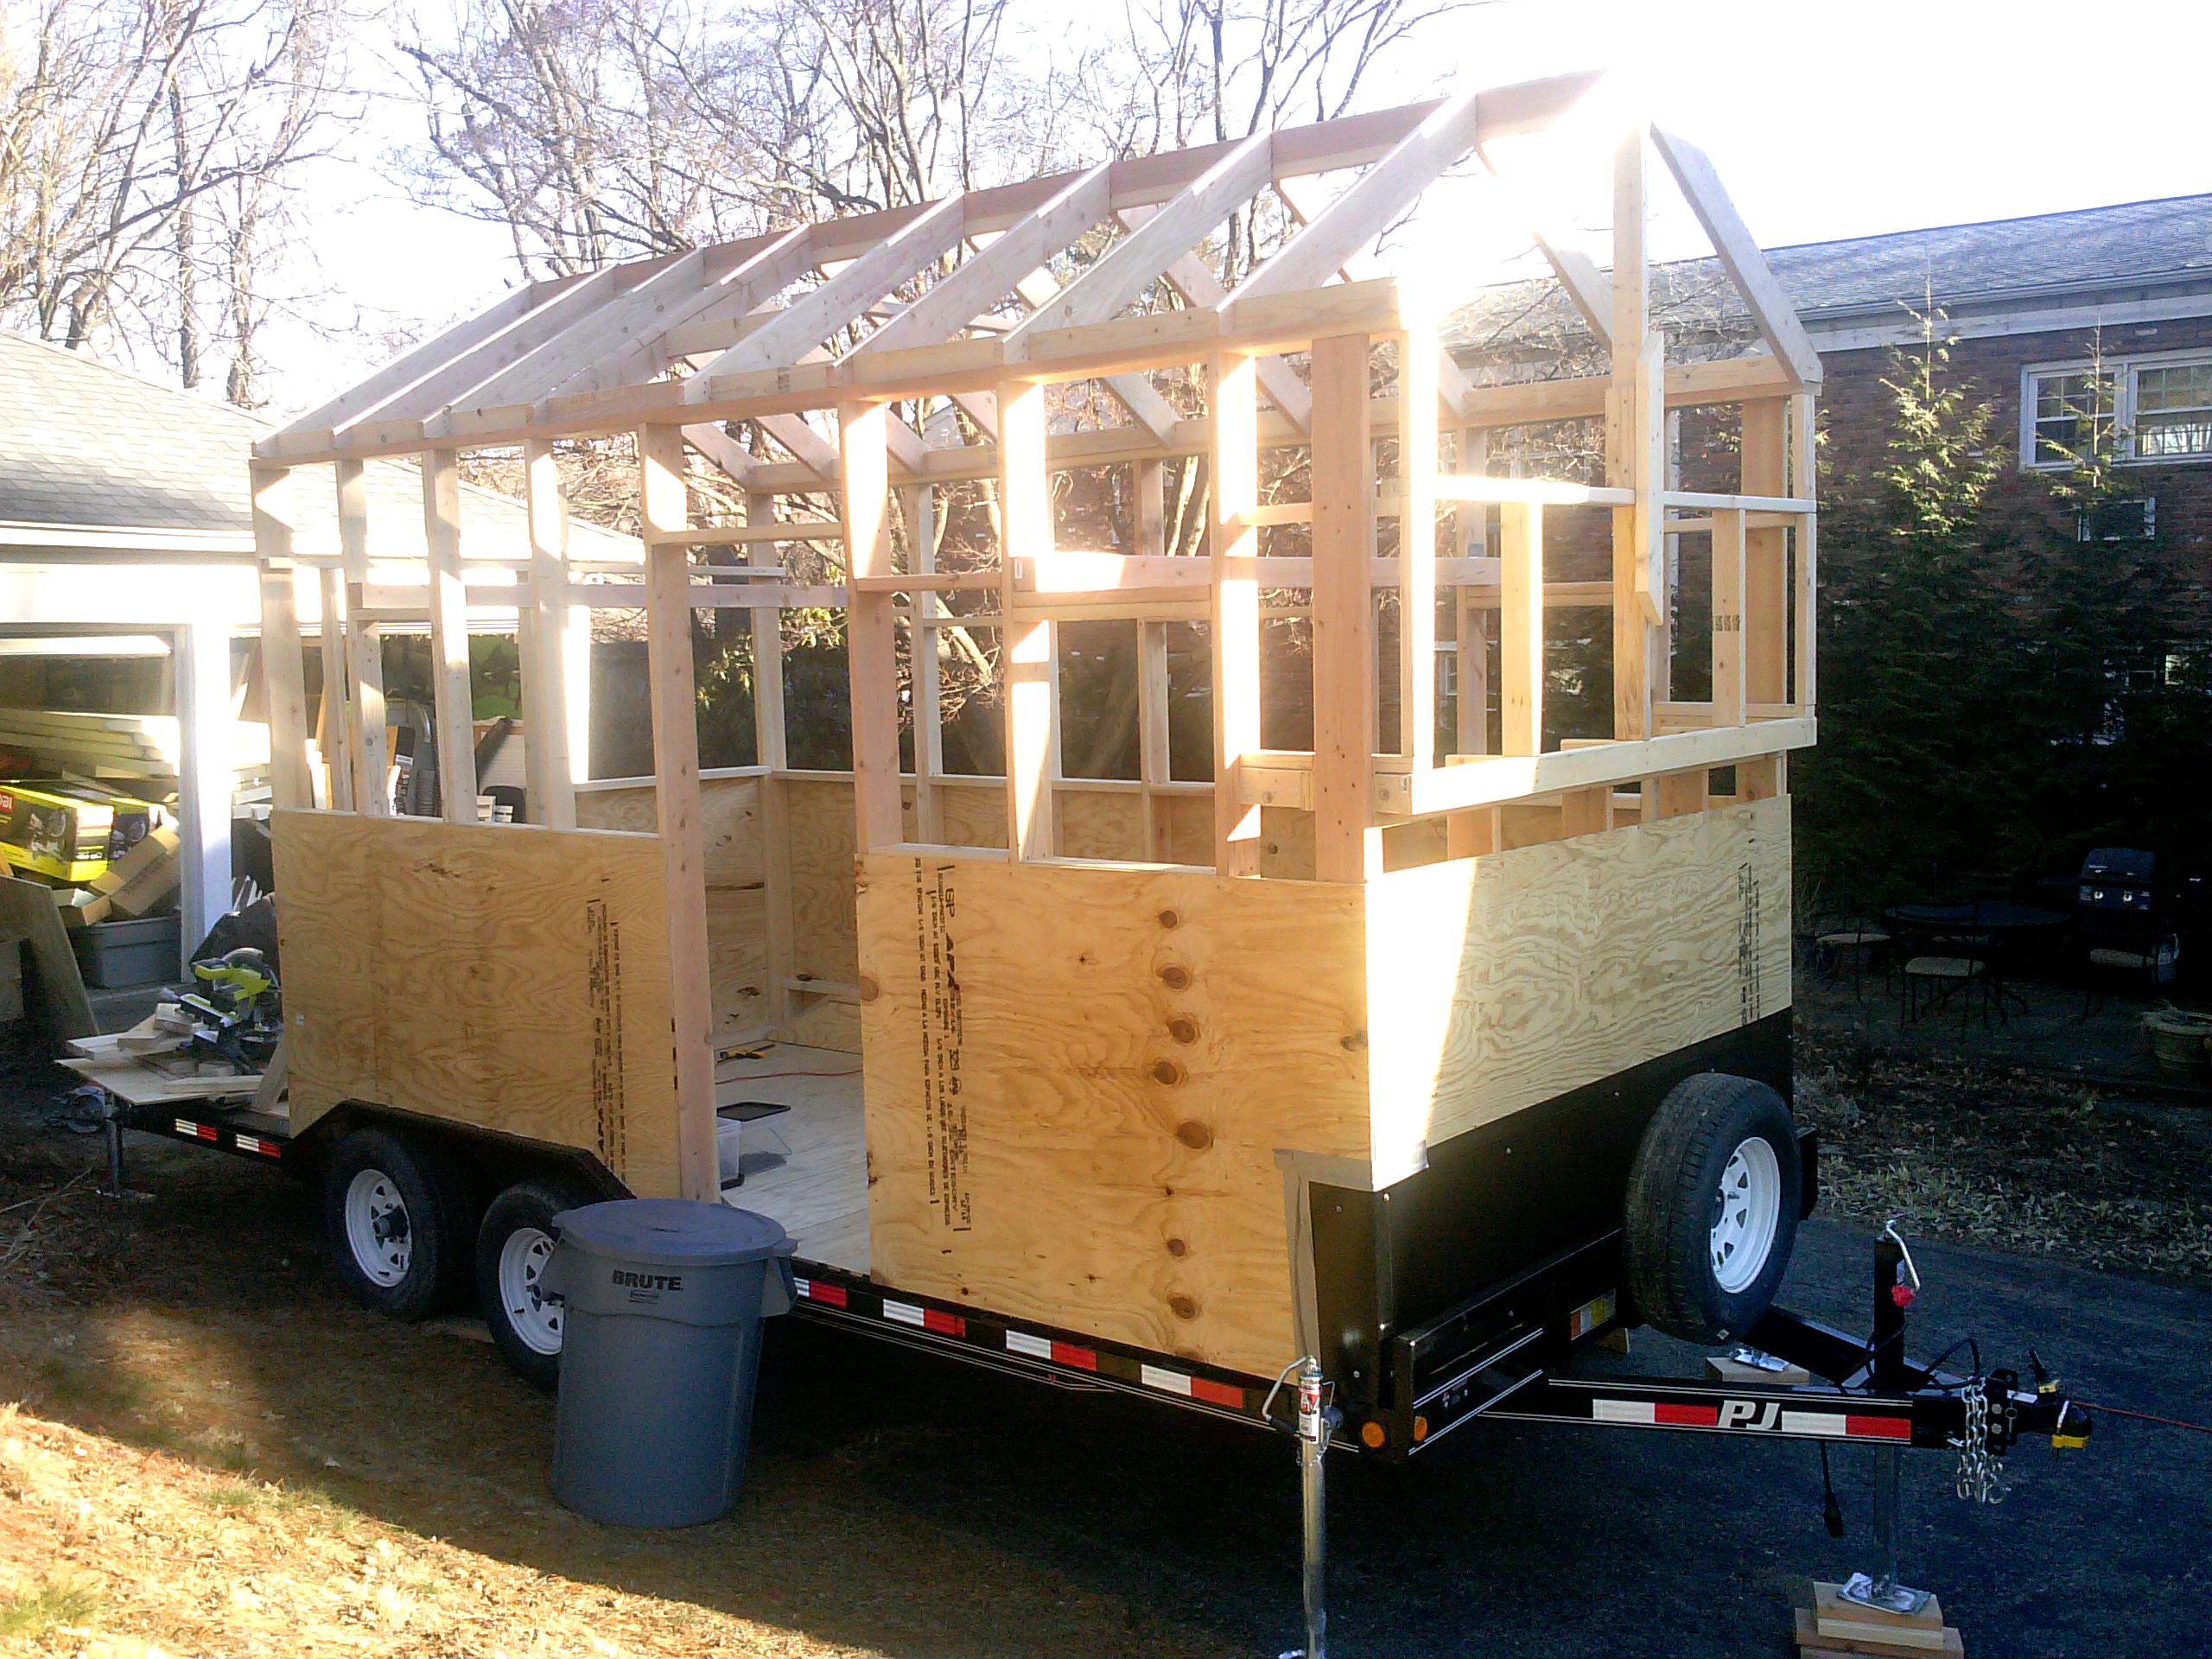
The walls and roof of the tiny home were then erected, following the principles of advanced framing. This is a relatively new, simplified, and more efficient set of framing techniques that reduces the amount of lumber used, while maintaining the building's structural strength. While gaining popularity amongst home builders in general, advanced framing is especially popular with tiny home builders because it has the potential to reduce the weight of the framing by an estimated 10-15% - and when you're building a tiny home, any trick to keep the weight down is very much appreciated! In addition to saving on materials, advanced framing also helps reduce thermal bridging, thus improving the thermal efficiency of the tiny home by an estimated 5%.


- 2x6 studs on 24" centers: While some tiny home builders have been known to successfully apply advanced framing techniques to a 2x4 frame, the general recommendation is to use 2x6 lumber. And since we were designing this particular tiny home to endure severe winters and heavy snow loads, we appreciated the deeper insulation bays and extra structural strength of the 2x6 frame.
- 2x6 rafters also on 24" centers, directly in line with wall studs: "In-line" framing helps transfer roof loads directly to the wall studs, reducing top plate deflection, which allows for the use of...
- Single 2x6 top and bottom plates: In the case of a tiny home being built on a trailer, the trailer itself is already providing a very strong and rigid joist box to support the wooden frame. A single bottom plate (2x6 in our case) is still necessary however, as it serves the very important role of tying the structure to the trailer (more on that later). "In-line" framing then makes it possible to reduce the top plate to a single 2x6 as well
- 2-stud corner framing: Traditionally, 3 or more studs would be used when framing corners, leading to inefficient overuse of lumber and increased thermal bridging. Alternatively, 2-stud corner framing (aka high-efficiency corner framing) reduces the weight of the framing and also allows for insulation to be installed in the corners of the home, improving thermal efficiency. We then attached 1x2 furring strips to the corner stud to help support the interior walls (you can also use metal clips or plywood gussets for this).
- Eliminating headers in non-load-bearing walls: With a simple gable roof like ours, the framing of the non-load-bearing end walls can be further simplified by eliminating unnecessary headers.

Other tiny-home-specific framing techniques used in this build were:
- Anchoring the tiny home to the trailer frame: A very important step, we followed the traditional tiny home approach of using (12) 1/2" carriage bolts to securely anchor the bottom plate to the load-bearing C-channel joists of the trailer frame. We also made sure to securely tie the wall studs to the bottom plate via our 1/2" CDX plywood sheating, in addition to toe-screwing the studs directly to the bottom plate.
- Hurricane clips attached to every rafter: While hurricane clips are not required for homes built in many states, for tiny homes they are a necessity. If your tiny home is traveling down the highway at 50 mph and you encounter a strong headwind, then your tiny home is being subjected to the equivalent of a Category 1 hurricane!
- Simple rectangle, continuous sheathing: another consideration related to tiny homes is the extreme shear stress that the structure may be subjected to when, for example, you accidentally hit a pothole while towing the tiny home! This is the equivalent of a home being subjected to a powerful earthquake. A lightweight and efficient strategy to effectively brace the tiny home is to keep the building shape as simple and rectangular as possible; keep the building dimensions within standardized lumber dimensions; and fortify the structure with a continuous, exterior-grade sheathing. In our case, the "main" structure is a simple rectangle, 8 ft wide by 16 ft long, allowing us to easily tie the building together with continuous 2x6x16 ft long sill plates and full-size 4x8 sheets of 1/2" CDX plywood sheathing. Opting for a simple gable roof also simplified the sheathing process.
- Screws not nails: An often-overlooked detail in tiny home design is the effect of regular vibrations and shear stress on fasteners. To keep the tiny home tight, we relied almost exclusively on exterior-grade screws throughout the build, rather than nails. The one exception was the installation of the hurricane clips, in which case we opted for ring-shank nails to ensure the nails would not be worked out with time.
- Window widths match stud spacings: Another common tiny home trick is to opt for smaller windows that fit between the existing stud spacings. This is especially easy when framing on 24" centers, as there are a number of windows available at 22.5", 23", or 24" widths. This allows you to keep the framing as simple and minimal as possible, eliminating the need for jack studs and minimizing headers. It is even a somewhat-common tiny home practice to resort to a custom-made, 24" wide exterior door, although in our case we opted for a more standard 30" door width, which did necessitate a heavier standard rough opening.
- Symmetry and weight distribution: Just like loading a trailer, when building a tiny home on a trailer you need to ensure the weight of the structure is evenly distributed, both side-to-side and front-to-back. In our case, we kept the framing identical for both of the side walls by placing a picture window directly across from the 30" exterior door, for identical rough openings in both walls. As for front-to-back weight distribution, we placed the more lightweight greenhouse at the rear of the trailer, ensuring the majority of the load would remain safely to the front of the trailer axles and on the tongue.


This part of the build was done in essentially the same way as a contemporary house build. Exterior grade plywood sheathing was covered in house wrap, and self-healing flashing was applied at the corners and the sills of door and window rough openings. Doors and windows were then installed and flashed, carefully lapping the flashing with the house wrap. We used energy-efficient, double-pane, Low-E, locking awning windows to keep the envelope nice and tight for winter.


As mentioned earlier, the first stage of rainwater catchment is selecting materials for the roofing, gutters, and downspouts that will not corrode or leach impurities into the rainwater. In this case, we used anodized aluminum for the roofing and gutters, stainless steel mesh gutter guards, and PVC downspouts to divert the rainwater to a custom-built, 35-gallon, food-grade, HDPE rainwater tank located inside the tiny home. In the interests of keeping this tiny home as passive as possible, the rainwater tank was installed overhead. This allows for the use of gravity-fed water fixtures.
In addition to the initial "mechanical filtration" provided by the gutter guards, we also installed a Sch 40 PVC first flush diverter, located in the interior utility closet just before the rainwater tank. Based on the square footage of the catchment area, the first flush diverter was sized to divert the first 10-20 minutes of rainfall away from the catchment tank, allowing the rain to "rinse off" any dust or other particles that may accumulate on the roof surface during dry weather. After 10-20 minutes of rainfall, an internal float then closes off the diverter's inlet, and the remainder of the rain is then collected in the catchment tank. Rather than rely on a fixed, ultra-small-diameter outlet hose like many over-the-counter first flush diverters, we installed a ball valve at the outlet so the drain rate of the diverter can be finely adjusted.

The final stage of our rainwater filtration system is a point-of-use charcoal filter. In lieu of an in-line water filtration system (which would most likely require an electrical water pump or a power source of its own), we opted instead for a Berkey, a passive, gravity-fed charcoal filter in a stainless steel housing, providing a potable water tap at the kitchen sink. The other kitchen faucet, as well as the bathroom faucet and shower, are simply unfiltered rainwater.


Part 5: Insulating and Finishing the Interior
The walls and ceiling were mainly insulated using batts of recycled denim, a natural cotton insulation that contains no chemical irritants or VOCs, ensuring a good interior air quality. In the wall and ceiling bays near the wood stove and chimney, rock wool insulation was used, a non-combustible natural insulation option with no VOCs; although rock wool is not a recycled product like denim so it does have a higher environmental footprint. Once the walls and ceiling were fully insulated, 5/8" tongue and groove fir beadboard was installed as the interior wall and ceiling material. Then the kitchen and bathroom counters were framed in, and the walls and ceiling were trimmed and finished with boiled linseed oil, a natural polymerizing oil that also does not emit VOCs.


Part 6: Heating and Cooking with the Wood Stove
This tiny home was designed with several quite revolutionary principles in mind. As mentioned earlier, a strong emphasis was placed on natural materials, to both reduce the environmental footprint of the building and improve indoor air quality. Another over-arching principle was self-sufficiency. This principle is expressed in the off-grid nature of several elements of the design, including autonomous potable rainwater catchment and photovoltaic energy production. Another deliberate expression of the self-sufficiency principle is the reliance on a small cast iron multi-fuel stove for space heating and cooking. This provides the inhabitants with the flexibility to secure their own fuel supply - be it local scrap wood, corn cobs, nut shells, etc. - without being dependent on purchased propane, natural gas, electricity from the grid, etc.
There are many tiny cast iron stoves to choose from, including "marine stoves" which are designed specifically for use on small boats. However, there are several important features that a stove needs to have in order to be safe to install in a small space. These include reduced clearances to combustibles, the availability of direct air intake, and the ability to secure the stove to the floor. You should also be sure to follow the required hearth dimensions for a particular model, and install a carbon monoxide detector as well.
We found that there are actually very few tiny stoves out there that are listed with reduced clearances to combustibles. For a tiny home, that detail is pretty much a necessity. By default, an unknown cast iron stove should maintain 36" clearance to combustibles - and in a tiny home with an interior width of around 7 feet, that makes for a very tight fit. This same principle applies to the chimney pipe as well - double walled chimney pipe with reduced clearances are important when you're installing a stove in a tight space, to ensure the entire assembly maintains proper clearances.

Another consideration is the availability of direct air intake for a particular stove model. This allows the stove to "pipe in" exterior air through a duct, leaving the indoor air supply untouched. Stoves without direct air are actively consuming the indoor air supply, meaning the inhabitants are reliant on drafts or ventilation to resupply the home with fresh air. For this reason, direct air is a good feature for a stove to have in any tightly-built home, especially in tiny homes with a much smaller volume of indoor air.
Ultimately we installed a Hobbit wood stove from Salamander Stoves, a small, high-quality, multi-fuel, cast iron stove manufactured in the UK. The stove is listed with 450 mm (17.75") clearance to combustibles, which we were able to reduce further with the installation of a heat shield around the hearth area. The stove also came with a built-in direct air intake system, which we ducted through the floor of the tiny home. Pre-drilled holes in the stove's feet made it easy to secure the stove by bolting it to the floor, and we also equipped the tiny home with a carbon monoxide detector. The Hobbit's stove top is approximately 10”x12”, allowing for one large pot or pan, or two smaller ones to be used on the cooktop simultaneously. And despite its small size, this stove makes easy work of boiling water or cooking food. We also fitted the stove with a stove thermometer to help regulate temperatures for cooking - this makes baking in the Dutch oven much easier.

The tiny home's off-grid photovoltaic system consists of a 180-watt solar panel array, 20 amp MPPT solar charge controller, 12v 110 Ah LiFePo battery bank, and a 350w inverter. To keep the tiny home as energy-efficienct as possible, the inverter supplies power to a single 120v ac 3-prong wall outlet, which can be used as needed for small household appliances. The inverter is fitted with an adjustable low voltage diconnnect module, which we set at 11.8 volts. A toggle switch in the utility closet turns on the inverter only when necessary.


The rest of the electrical system of the tiny home runs off of 12v direct current, supplied through the charge controller's built-in 20 amp load terminals and making use of the charge controller's built-in 11.0 volt low voltage disconnect. There are three 12v dc interior light fixtures, fitted with energy-efficient 12v dc LED light bulbs, and a 12v dc wall outlet with 1 USB-A quick-charge outlet, 1 USB-C PD outlet, and 1 CLA “cigarette lighter adapter” outlet. This system has proven to be sufficient for 2 people running laptops all day in the dead of winter here in New York, in addition to lights and a variety of small appliances. In the summer half of the year we have virtually unlimited electricity, and we use the surplus power to run a variety of battery-powered landscaping tools to maintain a 11-acre property.


Another very unique feature of this tiny home is the 4’x8’ passive solar greenhouse, which doubles as a bathroom. The walls and ceiling of this room are done using polycarbonate greenhouse panels, which allow for impressive passive solar heat gain on sunny or partly sunny winter days. We have found that even on days as cold as -25 degrees Fahrenheit, if the sun is out and the greenhouse is facing south, the tiny home will maintain a comfortable 70 degree interior temperature without the need for the wood stove. At night the door to the bathroom can be kept closed to keep the heat in. In the summer months, a 10’x20’ portable shade cloth is used to reduce solar heat gain (see photos).


We built 6 wooden racks that can hold four 7.5”x15” wooden seedling trays each, for a total of 24 trays. There are also 2 additional auxiliary racks that can be used with standardized plastic 1020 trays. Here in New York State, we normally start leek and onion seeds in February, heating the attached greenhouse using the tiny home’s wood stove when necessary, and have the greenhouse brimming with all types of seedlings by May.


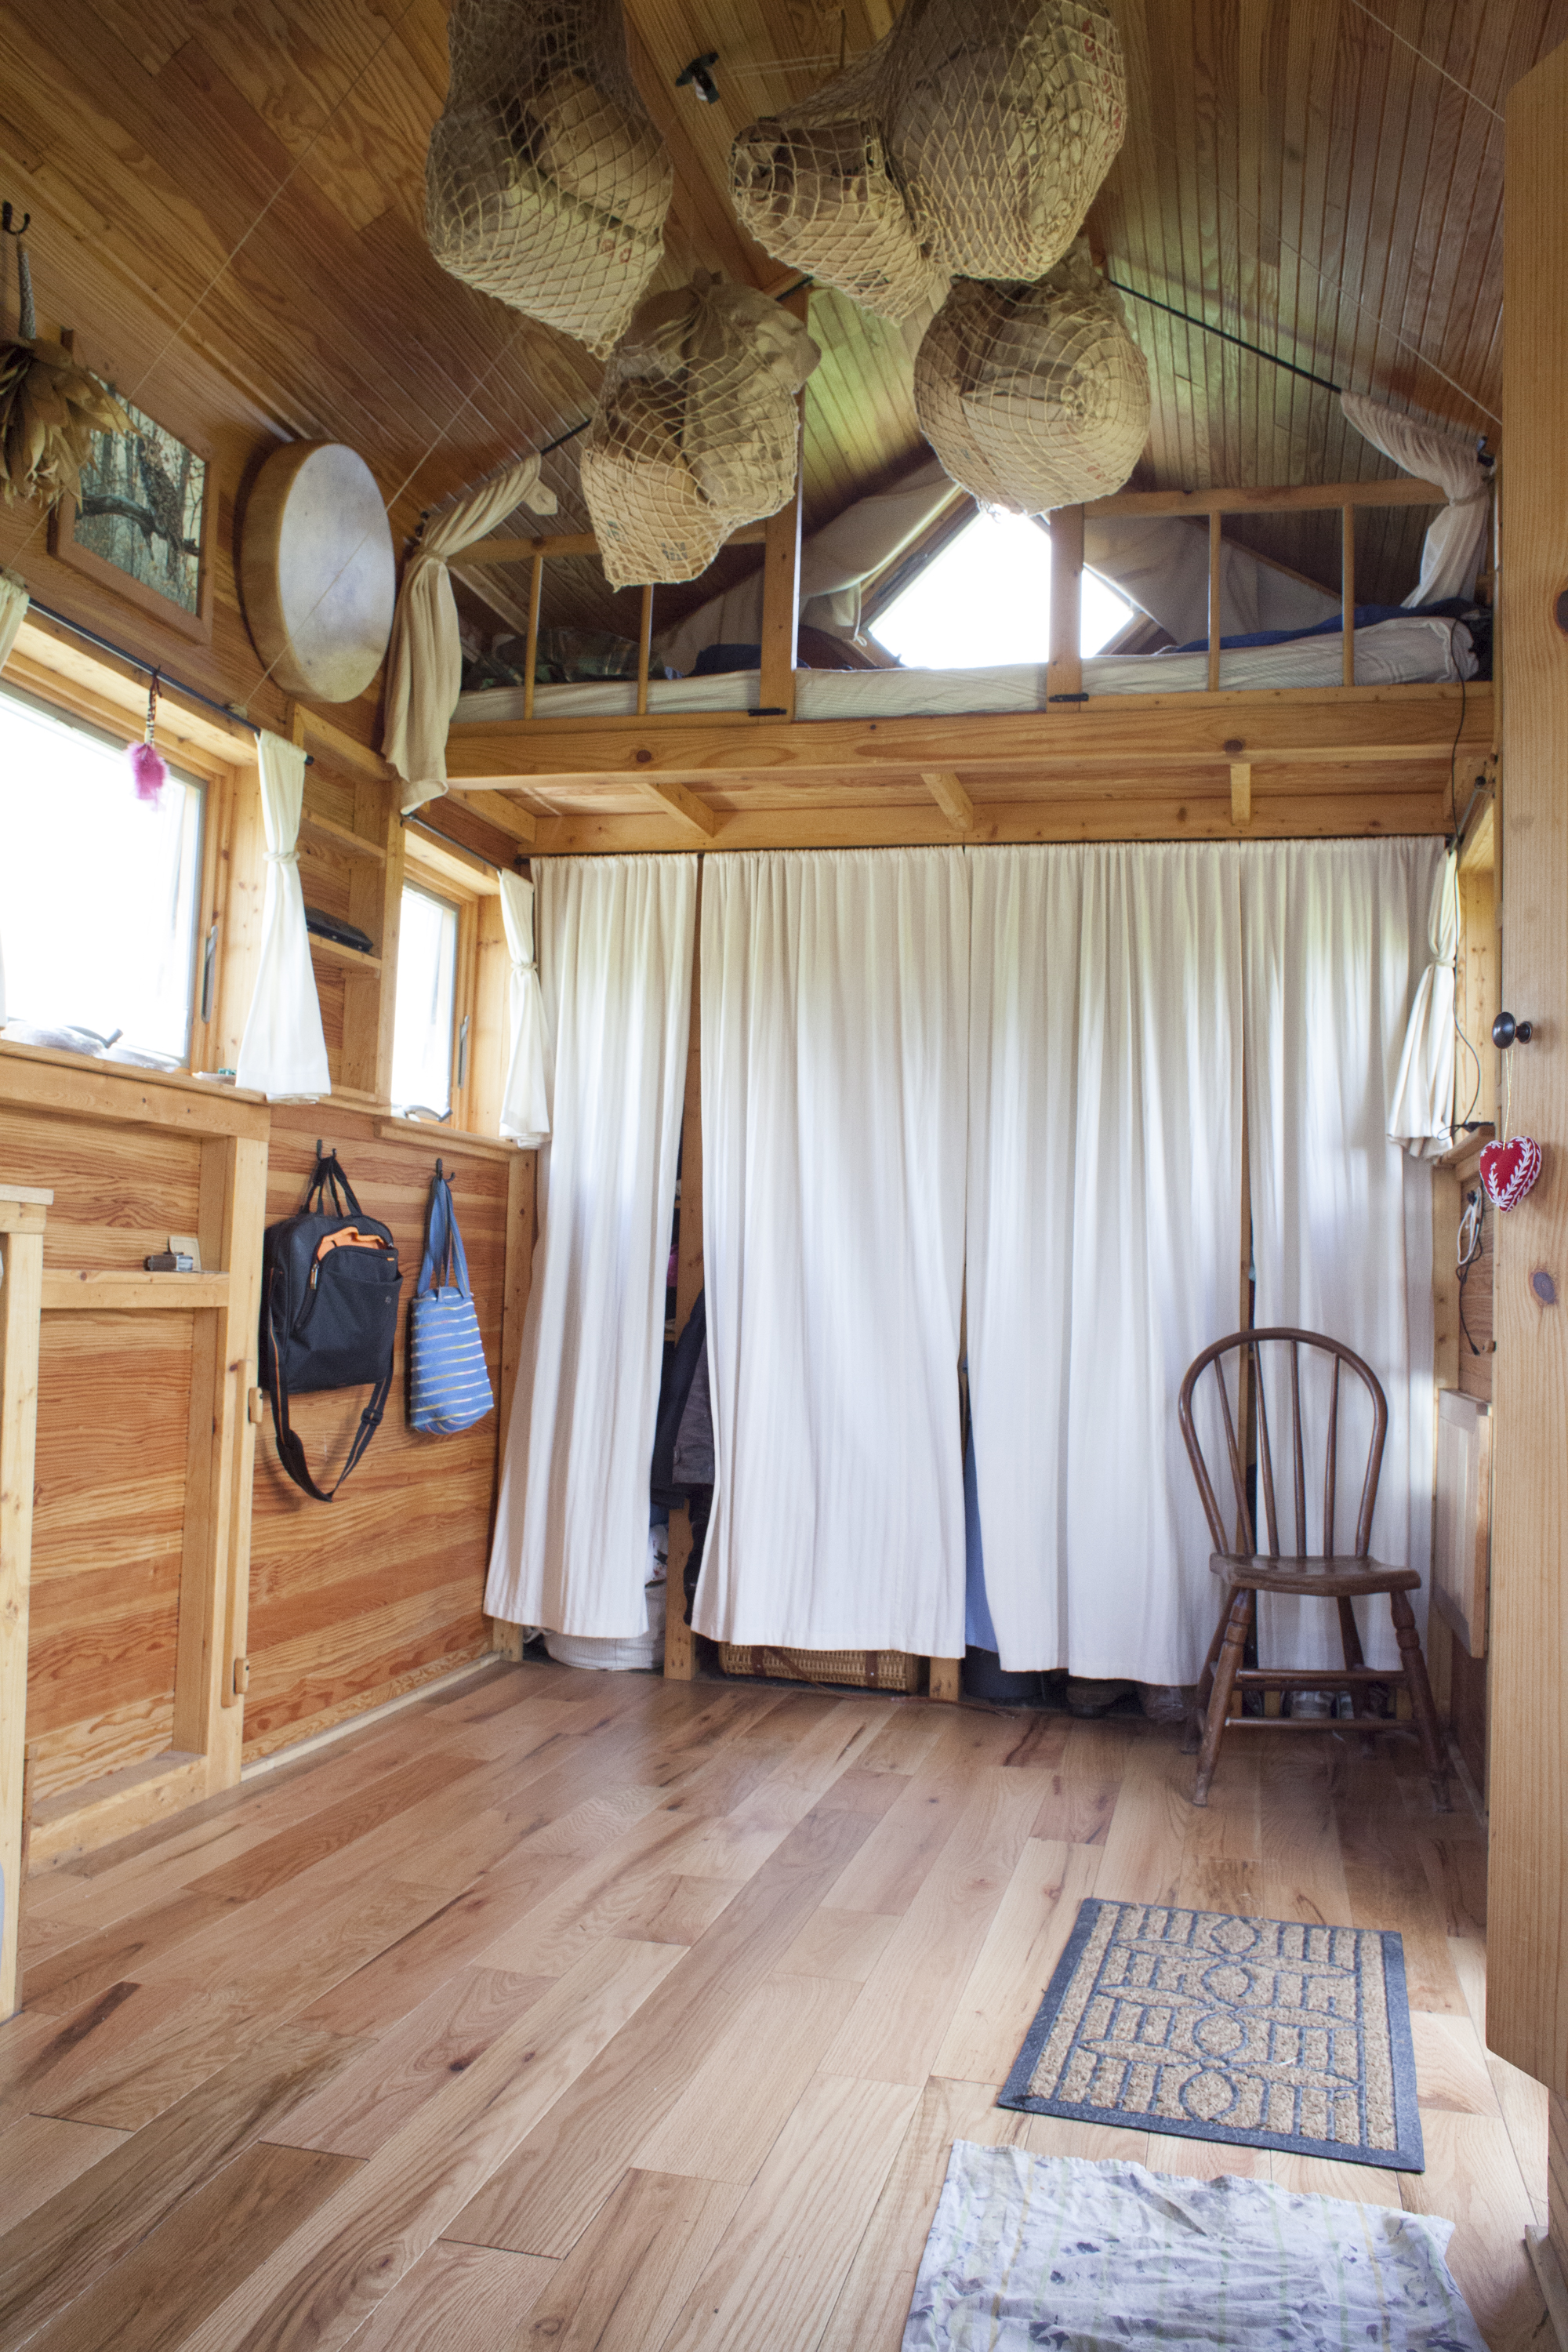
A common theme found across tiny home builds is innovative storage design. Interior square footage is at a premium, and with a little creativity this can be turned into a particularly fun opportunity for artistic expression. Staying true to the tiny home's over-arching theme of a return to natural materials and a simpler way of life, we installed an overhead pulley system with all-natural woven jute storage sacks. This allowed us to utilize the overhead bonus space provided by the cathedral ceiling.
The tiny home also has several built-in shelving units and storage nooks recessed in the walls. There are 2 recessed shelves in the loft and several recessed shelves in the main room area. Polyiso foam was used to insulate the walls behind these wall cavities, to maintain a consistent insulation value in the walls and eliminate thermal bridging behind the wall cavities.


The design of this tiny home incorporates a number of innovative features, and strives to carefully balance a high living standard with a reduced environmental footprint and a commitment to an off-grid, sustainable way of life. It prioritizes natural materials throughout the build, including hardwood flooring, interior and exterior natural wood walls, and recycled denim insulation, ensuring a healthy interior air quality free of VOCs and other synthetic odors. And the off-grid photovoltaic system, potable rainwater catchment system, and versatile multi-fuel cast iron stove ensure that this tiny home would be able to remain self-reliant in many regions of North America, including the frigid North.


.jpg)


No comments:
Post a Comment